
How to Make a Website from Scratch Using PHP and MYSQL
In this tutorial, I am going to teach you how to create a dynamic website from scratch using PHP 7 and Mysql. This article is a nice real-life example that can help beginner learners to understand the basics of PHP and MYSQL. It is written for educational purposes, however, it represents a good base that can be used to deliver a fully-operational digital product. Together, we shall create an example website with login and registration form. At the end of the article you will be able to connect PHP with MYSQL, create a website from scratch and add dynamic content to it. In order to get the most of this article, you need to have some basic knowledge of PHP. You also need a webserver (localhost or hosting account), where you can put the scripts. Last but not least, you need a code editor (Notepad ++ is enough for now). I tested the codes and I can confirm that they are working on my test web server.

Table of Contents
1. Create a database
Before we can get things started, we need a database and a table, where users can register. Run the following query in MYSQL (you can use phpmyadmin):
CREATE DATABASE db_1;
Congratulations! You have created a database “db_1”. Now we need to create a table with columns for username, email, password and a date. Run the following in MYSQL:
CREATE TABLE IF NOT EXISTS `user` (
`id` int(11) NOT NULL AUTO_INCREMENT,
`username` varchar(50) NOT NULL,
`email` varchar(50) NOT NULL,
`password` varchar(50) NOT NULL,
`trn_date` datetime NOT NULL,
PRIMARY KEY (`id`)
);
Good job! We are done with the MYSQL part for now. Now it is time to connect PHP and MYSQL
2. Connect PHP and MYSQL
Create a db.php file and put it in the root directory of your webserver. (If you are running XAMPP on Windows, this is htdocs. If you run an Apache webserver on Ubuntu, you need to put the file in var/www/html). Paste the following code in your code editor:
db.php
	<?php
	$servername = "localhost";
	$username = "root";
	$password = "";
	$dbname = "DB_1";
	// Create connection
	$conn = mysqli_connect($servername, $username, $password, $dbname);
	// Check connection
	if (!$conn) {
		die("Connection failed: " . mysqli_connect_error());
	}
	?>
3. Create Homepage
We need to create a home page. However, we might want to have a default page template, e.g. header and footer that are constant on all the pages. This can save as a lot of time, instead of having to code each page manually. For the purpose, create three new php files: Header.php, Footer.php and Index.php.
header.php
<!DOCTYPE html PUBLIC "-//W3C//DTD XHTML 1.0 Strict//EN"
	"http://www.w3.org/TR/xhtml1/DTD/xhtml1-strict.dtd">
	<html xmlns="http://www.w3.org/1999/xhtml" xml:lang="en" lang="en">
	<head>
		<meta http-equiv="Content-Type" content="text/html; charset=UTF-8" />
		<meta name="description" content="A short description." />
		<meta name="keywords" content="put, keywords, here" />
		<meta name="robots" content="noindex" />
		<meta name="viewport" content="width=device-width, initial-scale=1, maximum-scale=1, user-scalable=no">
		<title>PHP-MySQL Website from Scratch</title>

		<!-- Latest compiled and minified CSS -->
		<link rel="stylesheet" href="https://maxcdn.bootstrapcdn.com/bootstrap/3.3.7/css/bootstrap.min.css" >

		<!-- Optional theme -->
		<link rel="stylesheet" href="https://maxcdn.bootstrapcdn.com/bootstrap/3.3.7/css/bootstrap-theme.min.css" >

		<link rel="stylesheet" href="style.css" >
</head>footer.php
<div id="footer"> ©2017</div>
<!-- jQuery library -->
<script src="https://cdnjs.cloudflare.com/ajax/libs/jquery/3.2.1/jquery.min.js"
integrity="sha256-hwg4gsxgFZhOsEEamdOYGBf13FyQuiTwlAQgxVSNgt4=" crossorigin="anonymous"></script>
<!-- Latest compiled and minified JavaScript -->
<script src="https://maxcdn.bootstrapcdn.com/bootstrap/3.3.7/js/bootstrap.min.js"
integrity="sha384-Tc5IQib027qvyjSMfHjOMaLkfuWVxZxUPnCJA7l2mCWNIpG9mGCD8wGNIcPD7Txa" crossorigin="anonymous"></script>style.css
body {
  padding-top: 40px;
  padding-bottom: 40px;
  background-color: #eee;
}

.form-signin {
  max-width: 330px;
  padding: 15px;
  margin: 0 auto;
}
.form-signin .form-signin-heading,
.form-signin .checkbox {
  margin-bottom: 10px;
}
.form-signin .checkbox {
  font-weight: normal;
}
.form-signin .form-control {
  position: relative;
  height: auto;
  -webkit-box-sizing: border-box;
     -moz-box-sizing: border-box;
          box-sizing: border-box;
  padding: 10px;
  font-size: 16px;
}
.form-signin .form-control:focus {
  z-index: 2;
}
.form-signin input[type="email"] {
  margin-bottom: -1px;
  border-bottom-right-radius: 0;
  border-bottom-left-radius: 0;
}
.form-signin input[type="password"] {
  margin-bottom: 10px;
  border-top-left-radius: 0;
  border-top-right-radius: 0;
}
Finally, let’s make a very simple homepage. We will change it later, but let’s keep it really simple for now.
index.php
<?php
	require('db.php');
	include 'header.php';
	echo "<center><h3>Welcome to my Awesome Website!</h3></center>";
	echo '<center><div>New user? Please <a href="login.php">Login</a> or <a href="register.php">Register</a> </div></center>';
	include 'footer.php';
Put all of the files in the root directory of your web server. That’s it! Now we have a homepage and we have included the header and the footer. You should be able to access it at http://localhost/. Now, we need to create the registration form.
4. Create Register page
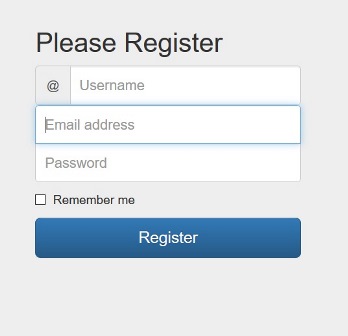
Create a file called register.php and use the following code:
register.php
	<?php
	require('db.php');
		// If the values are posted, insert them into the database.
		if (isset($_POST['username']) && isset($_POST['password'])){
			$username = $_POST['username'];
		$email = $_POST['email'];
			$password = $_POST['password'];

	 $sql = "INSERT INTO user (username, password, email)
	VALUES ('$username', '$password', '$email')";

	if (mysqli_query($conn, $sql)) {
		echo "<center><h3>New record created successfully!<br/>Click here to <a href='login.php'>Login</a></h3></center>";
	} else {
		echo "Error: " . $sql . "<br>" . mysqli_error($conn);
	}

	mysqli_close($conn);

		}

		?>
	<html>
	<head>
		<?php include 'header.php'; ?>
		<meta name="robots" content="noindex" />
	</head>
	<body>

	<div class="container">
		  <form class="form-signin" method="POST">

		  <?php if(isset($smsg)){ ?><div class="alert alert-success" role="alert"> <?php echo $smsg; ?> </div><?php } ?>
		  <?php if(isset($fmsg)){ ?><div class="alert alert-danger" role="alert"> <?php echo $fmsg; ?> </div><?php } ?>
			<h2 class="form-signin-heading">Please Register</h2>
			<div class="input-group">
		  <span class="input-group-addon" id="basic-addon1">@</span>
		  <input type="text" name="username" class="form-control" placeholder="Username" required>
		</div>
			<label for="inputEmail" class="sr-only">Email address</label>
			<input type="email" name="email" id="inputEmail" class="form-control" placeholder="Email address" required autofocus>
			<label for="inputPassword" class="sr-only">Password</label>
			<input type="password" name="password" id="inputPassword" class="form-control" placeholder="Password" required>
			<div class="checkbox">
			  <label>
				<input type="checkbox" value="remember-me"> Remember me
			  </label>
			</div>
			<button class="btn btn-lg btn-primary btn-block" type="submit">Register</button>
		  </form>
	</div>

	</body>

	</html>
This php code is creating a line in the “user” table from the database db_1, whenever a new user fills in the registration form. Now, go to http://localhost/register.php to check if everything works.
5. Create Login page
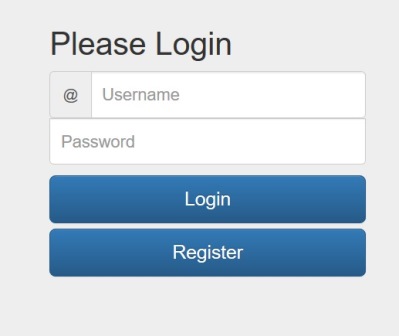
Create a file called login.php and paste the following code:
login.php
	<?php
	include 'header.php';
	//Start the Session
	session_start();
	 require('db.php');
	//If the form is submitted or not.
	//If the form is submitted
	if (isset($_POST['username']) and isset($_POST['password'])){
	//Assigning posted values to variables.
	$username = $_POST['username'];
	$password = $_POST['password'];
	//Checking the values are existing in the database or not
	$query = "SELECT * FROM user WHERE username='$username' and password='$password'";

	$result = mysqli_query($conn, $query) or die(mysqli_error($conn));
	$count = mysqli_num_rows($result);
	//If the posted values are equal to the database values, then session will be created for the user.
	if ($count == 1){
	$_SESSION['username'] = $username;
	}else{
	//If the login credentials doesn't match, he will be shown with an error message.
	$fmsg = "Invalid Login Credentials.";
	}
	}
	//if the user is logged in Greets the user with message
	if (isset($_SESSION['username'])){
	$username = $_SESSION['username'];
	echo "Hi " . $username . "";
	echo "! You are now logged in.";
	echo "<br><a href='index.php'> Home</a><a href='dashboard.php'> Dashboard<a href='logout.php'> Logout</a>";

	}else{
	//When the user visits the page first time, simple login form will be displayed.
	?>
	<html>
	<head>
		<title>User Login Using PHP & MySQL</title>
		<meta name="robots" content="noindex" />

	</head>
	<body>

	<div class="container">
		  <form class="form-signin" method="POST">
		  <?php if(isset($fmsg)){ ?><div class="alert alert-danger" role="alert"> <?php echo $fmsg; ?> </div><?php } ?>
			<h2 class="form-signin-heading">Please Login</h2>
			<div class="input-group">
		  <span class="input-group-addon" id="basic-addon1">@</span>
		  <input type="text" name="username" class="form-control" placeholder="Username" required>
		</div>
			<label for="inputPassword" class="sr-only">Password</label>
			<input type="password" name="password" id="inputPassword" class="form-control" placeholder="Password" required>
			<button class="btn btn-lg btn-primary btn-block" type="submit">Login</button>
			<a class="btn btn-lg btn-primary btn-block" href="register.php">Register</a>
		  </form>
	</div>

	</body>

	</html>
	<?php } ?>
The explanations are inside the above code, please read them carefully. What you need to understand is that php does a check with the database whether the submitted data exists in the user table that we have already created in MYSQL. If this is the case, the user can log in to the restricted area. This is the area for logged-in users, e.g. the dashboard.
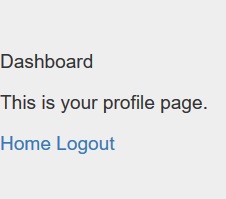
6. Create Dashboard and Logout
You need to have a dashboard page for the registered users. You first need to have a file called auth.php to memorize the session. In this way, any non-authorised (not logged-in) users who try to access the dashboard or any other restricted area of your site, will be redirected to login.php. You should require auth.php for all the pages in your restricted area.
auth.php
<?php
	session_start();
	if(!isset($_SESSION['username'])){
	   header("Location:login.php");
	}
	?>
Now create the dashboard.php file:
dashboard.php
<?php
	require('db.php');
	include("auth.php");
	include("header.php");
	?>
	<!DOCTYPE html>
	<html>
	<head>
	<meta charset="utf-8">
	<meta name="robots" content="noindex" />
	<title>Dashboard - Secured Page</title>
	<link rel="stylesheet" href="css/style.css" />
	</head>
	<body>
	<div class="form">
	<p>Dashboard</p>
	<p>This is your profile page.</p>
	<a href="index.php">Home</a>
	<a href="logout.php">Logout</a>
	</div>
	</body>
	</html>
This is how your dashboard page should look like in your browser:
And logout.php file:
logout.php
<?php
	session_start();
	// Destroying All Sessions
	if(session_destroy())
	{
	// Redirecting To Home Page
	header("Location: login.php");
	}
	?>
7. Different home page for a new user and a logged-in user
Now, remove the old index.php file and paste this code in index.php:
index.php
<?php
	require('db.php');
	include 'header.php';
	//Check if a user is logged in or not
	session_start();
		if (isset($_SESSION['username'])){
		$username = $_SESSION['username'];
		//Display a message for logged-in users only
		echo "<center><h3>Hello " . $username . "
		!</h3></center>";
		echo "<center><div><p><a href='dashboard.php'> Dashboard</a><a href='logout.php'> Logout</a></p></div></center>";

		}
		else{
		//Display different text if a user is not logged in.
		echo "<center><h3>Welcome to my Awesome Website!</h3></center>";
				echo '<center><div>New user? Please <a href="login.php">Login</a> or <a href="register.php">Register</a>
				</div></center>';
		}
	?>
	<html>
	<body>
		<header>
			<div class="container">
				<h3>About This Project</h3>

		<?php
		//If the user is logged-in
		if (isset($_SESSION['username'])){
		$username = $_SESSION['username'];
		echo '
	<nav class="navbar navbar-inverse navbar-fixed-top">
		<div class="container">
			<div class="navbar-header">
				<button type="button" class="navbar-toggle collapsed" data-toggle="collapse" data-target="#navbar" aria-expanded="false" aria-controls="navbar">
					<span class="sr-only">Toggle navigation</span>
					<span class="icon-bar"></span>
					<span class="icon-bar"></span>
					<span class="icon-bar"></span>
				</button>
				<a class="navbar-brand" href="#">My Awesome Website</a>
			</div>
		<div id="navbar" class="navbar-collapse collapse">
				<ul class="nav navbar-nav navbar-right">
					<li class="active"><a href="index.php">
						<span class="glyphicon glyphicon-home"></span>
						Home</a></li>
					<li><a href="#contact">Contact</a></li>
					<li><a href="dashboard.php"> Dashboard</a></li>
					<li><a href="logout.php"> Logout</a></li>';
	}
		//If the user is logged-out
		else{
		echo '
		<nav class="navbar navbar-inverse navbar-fixed-top">
			<div class="container">
				<div class="navbar-header">
					<button type="button" class="navbar-toggle collapsed" data-toggle="collapse" data-target="#navbar" aria-expanded="false" aria-controls="navbar">
						<span class="sr-only">Toggle navigation</span>
						<span class="icon-bar"></span>
						<span class="icon-bar"></span>
						<span class="icon-bar"></span>
					</button>
					<a class="navbar-brand" href="#">My Awesome Website</a>
				</div>

			<div id="navbar" class="navbar-collapse collapse">
					<ul class="nav navbar-nav navbar-right">
						<li class="active"><a href="index.php">
							<span class="glyphicon glyphicon-home"></span>
							Home</a></li>
						<li><a href="#contact">Contact</a></li>

			<li><a href="login.php"><span class="glyphicon
					glyphicon-log-in"></span> Login</a></li>
					<li><a href="register.php"><span class="glyphicon
					glyphicon-user"></span> Register</a></li>';

		}

	?>
			</div>
		</header>
		<section class="container" >
			<div class="row">
				<div class="col-md-9 content">
					 <p class="text-justify">This is an educational open-source project. It is a dynamic website, built from scratch using PHP and MySQL. The main functionality of the website is to allow users to register and log in. When a user registers, the data is stored in the database. When a user tries to log in, the database is checked. In case of a match, the user logs in. The data of the website changes when a user is logged in. That is why this is a dynamic website. The website uses some very basic styling from Bootstrap. Bootstrap is a CSS and JavaScript framework for developing responsive, mobile first websites.</p>
				</div>
			</div>

		</section>


		<footer class="container">
		   <?php include 'footer.php'; ?>
		</footer>

	</body>
	</html>
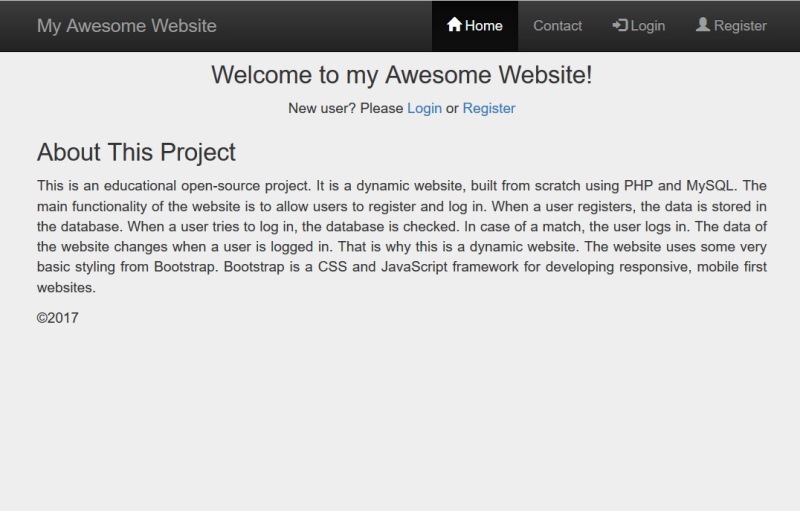
Now, when you go to http://localhost/, it should resolve to your new website!
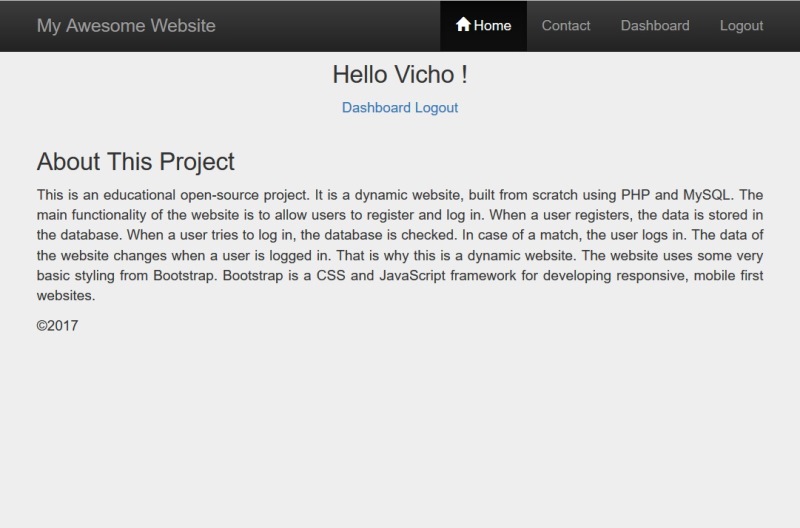
This code might seem quite overwhelming at first, however, the majority of it is just bootstrap classes and divs to make it look better and they are not in the scope of this article. What is important is to understand the logic of the code. Basically, the script checks whether a user is logged in or not and it is able to display a different message for logged-in and logged-out users.
Congratulations! You have accomplished quite a lot so far and you should be proud of yourself. We have built an educational dynamic PHP-MySQL website from scratch (excluding bootstrap). Feel free to use this code and play around with it. You can modify it as much as you want. You might for example want to develop a more sophisticated login system, include a comment section or even let users create their own posts.
Note: this code is for educational purposes only and it should not be used on a production website, since it is not secure. Security is not in the scope of this article.
© 2017 Atanas Yonkov